It’s one of the simplest but also most essential steps to “Conquering” a network. Once a hacker has performed a “Man In The Middle” attack (MITM) on a local network, he is able to perform a number of other “Side-kick” attacks. This includes: cutting a victim’s internet connection; intercepting Emails, logins, chat messages, and many others.
And only one tool is needed for this attack:
- An install or Live boot of Kali Linux, a well-known OS containing a collection of hundreds of penetration testing tools.
If you have that, then proceed to the tutorial below, and we’ll demonstrate how to perform this attack.
Important Notice:
This tutorial is intended to be used for penetration testing, i.e. the act of hacking to become more secure. It is not at all meant for malicious purposes. Performing any type of fraudulent activity on someone else’s network without permission is considered a crime in most countries. Lewis’s Computer Howto’s is using their own test network in this demonstration.
By reading and/or using the information below, you are agreeing to our Disclaimer,
Step One:
Start Kali Linux and login, preferably as the root user. When you’ve logged in, open a Terminal and enter this command: echo 1 > /proc/sys/net/ipv4/ip_forward. This enables IP forwarding, which is mandatory in order for the victim device to maintain connection while we are ARP poisoning it. This command will not be permanent; you’ll have to enter it every time that you restart Kali and wish to perform another MITM attack.
Step Two:
For whatever reason, ettercap doesn’t come ready to work from the factory. We need to make some small edits before it will work.
Open a Terminal and type: leafpad /etc/ettercap/etter.conf
Step Three:
Look through the text file that just opened. On one of the first lines, under the [privs] section, look for the words highlighted below:
You need to change the “ec_uid” and “ec_gid” values to zero. They should look like this when done:
Remove the number 65534 and replacing it with 0 (zero). You can leave the “# nobody is default” line. Step Four:
This next one will be tricky to locate, so we’re going to use the “Find” option. Click on Search in the toolbar at the top of leafpad and click Find, or hit Ctrl+F.
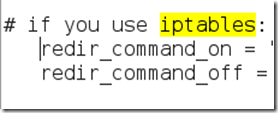
Type the word iptables in the box that appears and click the Find button or press Enter.
It should skip to a line that looks like this:
We need to “uncomment” the two bottom lines. To do this, remove the two “#” symbols before each “redir_command,” so that the two lines look like this:
Now close leafpad and click Yes when it asks you to save changes.
Step Five:
Now start Ettercap-gtk, open a Terminal and type ettercap –G
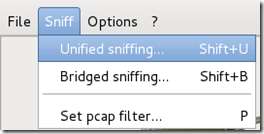
Wait until Ettercap opens. When it does, click Sniff in the toolbar and select Unified Sniffing… from the menu.
Step Six:
Select the interface that’s connected to the network.
If your using a wired (ethernet) connection, then the interface will probably be eth0, but if you’re using wireless, (WLAN), then it will be a different one. To find which one of your interfaces is connected, run ifconfig.
Step Seven:
Now Ettercap should load into attack mode. Click on Hosts and select Scan for hosts from the menu.
Step Eight:
Ettercap will briefly scan for hosts on the network. After a moment, you should see the words “hosts added to the host list…” in the command box.
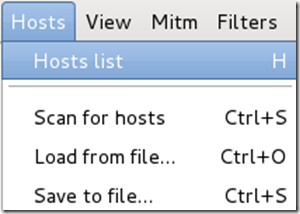
Click on Hosts again, and this time select Hosts list from the menu.
Step Nine:
Click the IP address of the router and click the Add to Target 1 button.
Then select the IP of your test victim’s machine and click Add to Target 2.
Step 10:
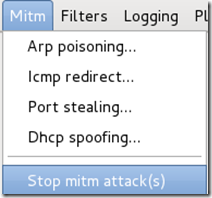
Now click Mitm on the toolbar and select Arp poisoning…
When the question box shows up, check the box next to Sniff remote connections and hit OK.
Step 11:
Ettercap will now Arp poison the victim and router. It might take a few minutes for the ARP process to work out, but once it does, your victim PC should be able to still connect to the internet without knowing that you’re virtually in between it and the router. If you’re victim can’t connect, make sure that you entered the “IP forward” command in Step 1 before starting ettercap. It might be a good idea to test this attack on one of your devices first, just to make sure that everything is going as planned.
You’ve successfully executed an MITM attack!
You can now use tools such as URLsnarf and SSLstrip to sniff out information about your victim’s internet traffic. You can also use etterfilters to cut you victim’s internet completely. Tutorials on how to use these tools will be coming soon.
To stop the MITM attack, click on MITM and select Stop mitm attack(s) from the menu.
Ettercap will then send the ARP correction packet, and the network will return to normal. You can then close Ettercap.
Ways to protect yourself against one of these attacks.
There are a couple of methods:
- ARP detection software
This method is pretty useless. There are very few ARP detection programs out there, and the few that do exist are either free junk or over priced. In addition, to use these programs on a windows machine requires installing special drivers for your wireless cards. Recommendation: Don’t use.
- Static ARP entries
This method works the best for the standard individual. You just type in a simple command and your computer becomes “Unarpable.” This is how it works:
When an attacker performs an ARP MITM attack, his computer sends a ARP packet to the victim’s machine telling it that his mac address is the router’s. The victim’s machine is fooled and starts sending its data to the attacker.
When you enter a static ARP entry, you’re telling your computer that the router’s mac address is permanent and will not be changed. Therefore, your computer ignores any phony ARP packets sent by the attacker.
We will be making a tutorial on how to do this soon. In the meantime, you can use Google to find answers.
We Hope You Enjoyed This Tutorial






Comments
Post a Comment