How to Install Apache, MySQL, PHP, and PHPMyAdmin on Ubuntu - If you are web programmer which using Ubuntu (Linux), maybe you will need installing Apache, MySQL, PHP, and PHPMyAdmin.
Apache is a name of Web Server. apache can be interpreted as the compact web server, modular, following the standard HTTP protocol, and popular with many people.
MySQL is a database software are free. MySQL have a function as SQL (Structured Query Language) in self and has expanded. And generally used with PHP.
PHP is stands for "PHP: Hypertext Preprocessor", programming language that is widely used for handling the manufacture and development of a website and can be used in conjunction with HTML.
PhpMyAdmin (shortened PMA) is a free software written in the PHP programming language that is used to handle the administration of MySQL over the web.
Below step by step to Install Apache, MySQL, PHP, and PHPMyAdmin on Ubuntu. First, installing apache2, Open your terminal, and write the command at below

Second, installing PHP5. Still on your terminal, use command below

Apache is a name of Web Server. apache can be interpreted as the compact web server, modular, following the standard HTTP protocol, and popular with many people.
MySQL is a database software are free. MySQL have a function as SQL (Structured Query Language) in self and has expanded. And generally used with PHP.
PHP is stands for "PHP: Hypertext Preprocessor", programming language that is widely used for handling the manufacture and development of a website and can be used in conjunction with HTML.
PhpMyAdmin (shortened PMA) is a free software written in the PHP programming language that is used to handle the administration of MySQL over the web.
Below step by step to Install Apache, MySQL, PHP, and PHPMyAdmin on Ubuntu. First, installing apache2, Open your terminal, and write the command at below
sudo apt-get install apache2Wait it until the progress of installing that package are done. After it, open your web browser to testing that package have installed, write on address bar "http://localhost". If the display like below, so the process of installation has been successful.
sudo apt-get install php5 libapache2-mod-php5After it restart that apache2 service
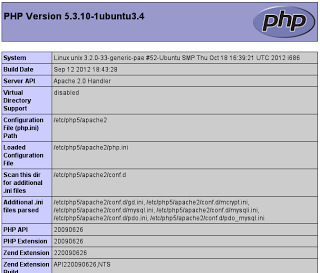
sudo /etc/init.d/apache2 restartNow, test the PHP5 using this way, create a PHP file on this directory /var/www/, and give name "phpinfo.php".
sudo gedit /var/www/phpinfo.phpOn the window of gedit, copy and paste script at below
<?php phpinfo(); ?>And than save it. After it, open that file using web browser in http://localhost/phpinfo.php, if the display like below, so that process are successful.
Comments
Post a Comment