Hai cang,cing,enya,baba, Calcune di mari –
Maaf jarang post ya fans wkwk
Tapi tenang kali ini gue mau ngeshare Tutor hack wifi router di windows atau bahasa kerennya Cara Hack dan Mengetahui Password Wifi WPA-WPA2 di Windows
tutorial ini cucok banget buat yang dirumahnya banyak wifi2 bertebaran milik tetangga :v akawkwakakw , mayan buat ngegame/ngesosmed awkakwawkawk
Langsung intip aja nyok
Siapin software:
1.Jumpstart
2.Dumper
3.Wincap
Download disini:
- SolidFiles
- 4shared
- Drive Google
Pastikan anda install dahulu Jumpstart nya setelah anda install jumpstart nya
Lalu anda install Wincapnya
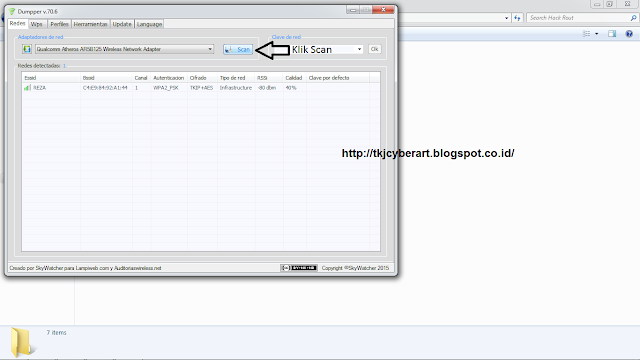
Setalah anda install Wincapnya buka Software Dumper nya

Pertama klik scan sampai wifi routernya nongol kaya yg di bawah wkwk
Kemudian anda klik WPS yg ada di menu atasnye :v

Kemudian anda scan, oiya sob jangan lupa pilih dulu SOLO REDES lalu anda klik wifinya sampai nick wifi nya nongol muncul di Essid wifi

Kemudian anda pilih TODAS LAS, lalu anda scan lagi sampai keluar no pin nya

Setelah keluar no pin nya anda klik no pin yang ada di menu sampai muncul di bawah kotak WPS PIN


Sekarang anda bisa cek langsung di wifi windows anda..SUCCESS :v

Silahkan nikmati wifi gratiss ;D
Gimana berhasilkan ?!
Mudahkan O.o ?
Stay Cool and and Keep ./Crotz ,gaes :'v
sampai ketemu sama gue, calcune_system di next tutorial berikutnya, terus pantengin aja ini blog awkakwak.
Bila ada kesalahan langsung aja koment di kolom komen, bila ada saran, pertanyaan, atau kritikan langsung aja ke wall FP kami: TKJ CYBER ART
Happy Hacked~
Semoga bermanfaat ^^
refrensi: galaxymous
./Calcune_System


Maaf jarang post ya fans wkwk
Tapi tenang kali ini gue mau ngeshare Tutor hack wifi router di windows atau bahasa kerennya Cara Hack dan Mengetahui Password Wifi WPA-WPA2 di Windows
tutorial ini cucok banget buat yang dirumahnya banyak wifi2 bertebaran milik tetangga :v akawkwakakw , mayan buat ngegame/ngesosmed awkakwawkawk
Langsung intip aja nyok
Siapin software:
1.Jumpstart
2.Dumper
3.Wincap
Download disini:
- SolidFiles
- 4shared
- Drive Google
(bila ada salah satu link yang mati, harap lapor dikolom komentar)
Pastikan anda install dahulu Jumpstart nya setelah anda install jumpstart nya
Lalu anda install Wincapnya
Setalah anda install Wincapnya buka Software Dumper nya
Oke Cekidott kita play
Pertama klik scan sampai wifi routernya nongol kaya yg di bawah wkwk

Kemudian anda klik WPS yg ada di menu atasnye :v

Kemudian anda scan, oiya sob jangan lupa pilih dulu SOLO REDES lalu anda klik wifinya sampai nick wifi nya nongol muncul di Essid wifi

Kemudian anda pilih TODAS LAS, lalu anda scan lagi sampai keluar no pin nya

Setelah keluar no pin nya anda klik no pin yang ada di menu sampai muncul di bawah kotak WPS PIN

Kemudian tentukan dulu lokasi dimana anda menyimpan instalasi jumstar kalau sudah klik Iniciar Jumpstart…. Tungguin sampai proses nyaselesai ..Kalau sudah selesai muncul deh password wifi router nya JENG JENGJENG

Sekarang anda bisa cek langsung di wifi windows anda..SUCCESS :v

done ^^
Silahkan nikmati wifi gratiss ;D
Gimana berhasilkan ?!
Mudahkan O.o ?
Stay Cool and and Keep ./Crotz ,gaes :'v
sampai ketemu sama gue, calcune_system di next tutorial berikutnya, terus pantengin aja ini blog awkakwak.
Bila ada kesalahan langsung aja koment di kolom komen, bila ada saran, pertanyaan, atau kritikan langsung aja ke wall FP kami: TKJ CYBER ART
Happy Hacked~
Semoga bermanfaat ^^
refrensi: galaxymous
./Calcune_System

Visit and follow :
Comments
Post a Comment